DIY Piggy Terrarium

DIY Terrarium | MeanRightHook.com

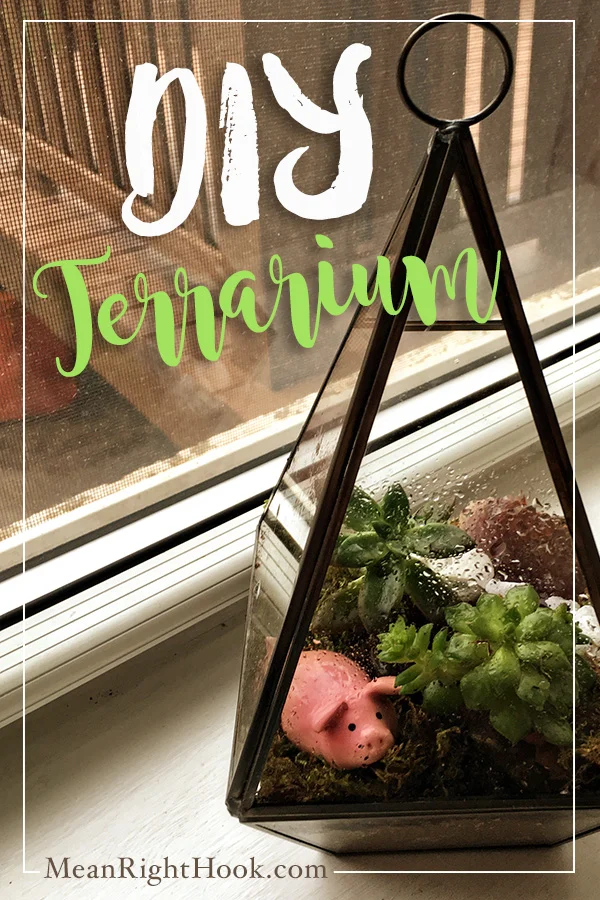
I've fallen in love with all the cute little terrariums I've been seeing around online and in a lot of stores. But man are they expensive! I've seen some run about $50! So I decided to try to make one myself. I definitely do not have a green thumb. I've never been able to keep a plant alive very long, but these seem pretty low maintenance. 

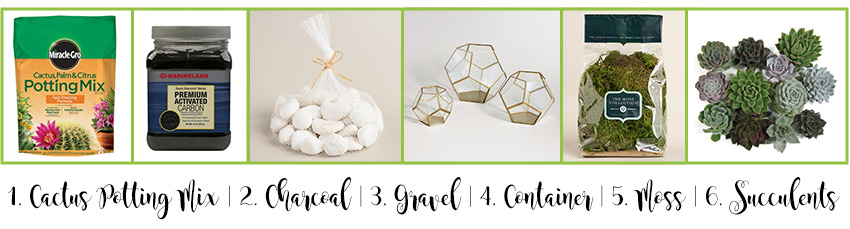
Here's what you need:

1. Cactus Potting Mix
2. Planting Charcoal
3. Gravel
4. Cute Container
5. Moss
6. Succulents
*optional: decorative miniatures* I got my little piggy from a craft fair. 

DIY Terrarium | MeanRightHook.com

• Start by adding a layer of gravel at the bottom of your container for drainage
• Then add a layer of charcoal and enough potting soil to be able to completely over the roots of your plants
• Plant your succulents in the soil
• Add your moss over the top of the soil and any decorations you like
• Lastly spritz your plants with a little water

I found everything to make my terrarium at Home Depot except my container. I found that at Jo-Ann's. I love how it turned out and it looks so cute in my bathroom! I totally need to make more now that I have all the supplies. These would make really cute gifts and it only took me about 30 minutes to do.
I'd love to see any terrariums that you make. Tag me in your instagram photos at @MeanRightHookDesigns

DIY Terrarium | MeanRightHook.com

Monogram Bundle on Little Big Crafter

Hey guys! I just wanted to tell you about my awesome monogram collection over on Little Big Crafter. You get 17 different monogram frames with commercial usage licenses for only $9! It's such an amazing deal. And if you use code: MEANRIGHTHOOK you get 20% off. Hurry, the deal is over in 28 days!

Mean Right Hook Monogram Bundle on Little Big Crafter

How to cut Fabric With Your Cricut Explore

How to Cut Fabric Wit Your Cricut Explore | MeanRightHook.com

When I first bought my Cricut last year I knew I wanted to use it for cutting things like fabric and felt but from all the things I read on the internet it was difficult to do and it never came out right. After reading tons of blogs and watching countless YouTube videos I set out to cut fabric. Turns out it is super simple and it took me no time at all to make an awesome fabric appliqué.

Here’s a little step by step on how to do it yourself.
Things you need:
1. Heat N’ Bond Ultra hold - I picked up a package of this at Jo-ann’s

2. Fabric - I used regular quilting fabric

3. Regular cutting blade - I’ve had my machine for 8 months and haven’t changed the blade yet and it cut just fine. Just make sure there’s nothing stuck to it or the housing.

4. Standard Cutting Mat

5. An Iron and a sturdy surface to iron on - My ironing board is super flimsy so I iron on a scrap piece of wood I have lying around my craft room.


1. Cut out your fabric. Make it bigger than your design.

2. Place your piece of fabric on your Heat N’ Bond and cut around it.

How To Cut Fabric With Your Cricut Explore | MeanRightHook.com

3. Iron on the Heat N’ Bond to the wrong side of your fabric. Make sure to read the instructions on the packaging.

4. Once it’s completely adhered, place it Heat N’ Bond side DOWN on your cutting mat. Your mat needs to be sticky to hold your fabric in place. If it’s not your fabric could catch the blade and shift around.

How To Cut Fabric With Your Cricut Explore | MeanRightHook.com

5. Cut out your design! I used the Fabric, Printable setting in the custom cut settings.

6. Once it’s cut out, remove the paper backing from the Heat N’ Bond and iron it on to your garment. That’s all it takes! 

How To Cut Fabric With Your Cricut Explore | MeanRightHook.com

Bonus: To make my fabric edges look more finished I cut an outline layer of glitter HTV and ironed that over the top of the fabric.

I can’t wait to give this to my friend and her new baby. I’d love to see your fabric projects your make with your Cricut! Or let me know if you have any questions. Just leave a comment below. 

Christmas Gift Round Up

The holidays are finally over and I can now resume my normal crafting. :) Here are just a few gifts I made this Christmas season.

I etched glass mason jars, crocheted ear warmers, made my own sugar scrubs for 15 of my friends at the gym and design their packaging, personalized stockings and made my husband a t-shirt. Whooo! And that's not even all the gift I made. I was certainly busy the month of December. I can't wait to get started on new projects this year!

DIY Christmas Gifts by MeanRightHook.com

Christmas Cards are done at last!

Last year I wasn't able to get myself together enough to send out Christmas cards. Raven was so little, I decided to give myself some slack and told myself to forget about doing them. This year I was going to make up for that and make some amazing cards.

I didn't get my Cricut until April so I was excited to be able to use it for my cards this year. I'm so happy with how they came out but man was it time consuming cutting out 30 of those sleeves. I did take the easy route and sent my photo card design to Walgreens to be printed.